how to use a circular saw?
2025-10-20
Table of content
Circular saws are versatile and powerful tools used in woodworking, construction, and DIY projects. Their high-speed rotating blades can cut through materials such as wood, plastic, metal, and even concrete with precision and efficiency. With its ability to make quick, accurate cuts, it’s an essential tool for craftsmen and hobbyists alike.
However, as powerful as it is, using a circular saw without proper knowledge can be dangerous. Understanding how to operate it safely is essential to prevent accidents and ensure accurate, smooth results.
This comprehensive guide is designed to help beginners use a circular saw effectively and safely. It covers everything from setup and basic operation to advanced cutting techniques and maintenance. By following these guidelines, you’ll gain the confidence and skills to make precise cuts while keeping safety a top priority.

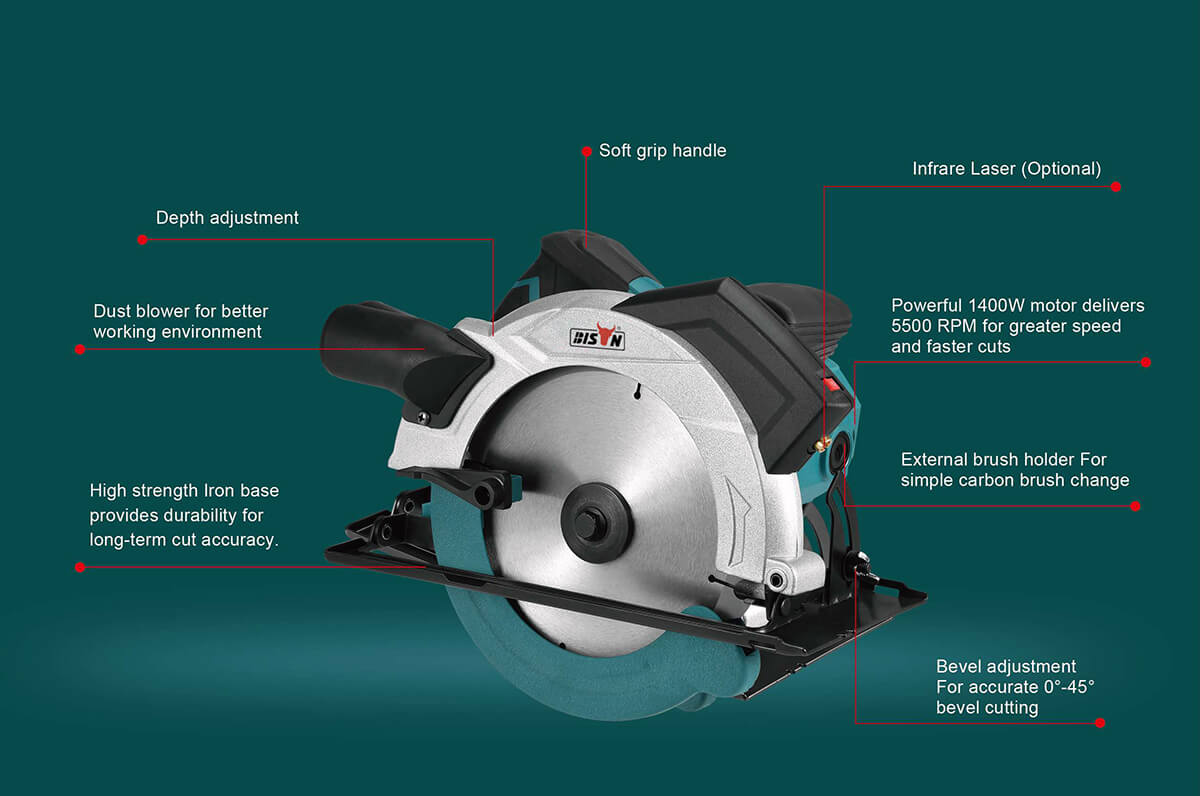
Understanding circular saws
To use a circular saw effectively and safely, it’s important to understand its key components. Each part contributes to cutting precision, performance, and user safety.
Circular blade: The blade is the most essential part of the saw—it performs the actual cutting. Circular blades come in different sizes and tooth configurations, each suited for specific materials and applications. Blades with more teeth produce smoother cuts, while those with fewer teeth cut faster. Choosing the right blade ensures clean, efficient results.
Motor and housing: The motor powers the blade, providing the force needed to cut through material. Circular saws can be corded (electric) or cordless (battery-powered). The housing protects the motor and internal components while maintaining a lightweight, balanced design for better control.
Base plate (shoe): The base plate, also known as the shoe, rests against the work surface and helps guide the saw along a straight line. It provides stability during cutting, ensuring precision and consistent depth.
Depth adjustment: This lever allows users to control how deep the blade cuts into the material. Proper depth adjustment improves accuracy, prevents excessive motor strain, and ensures cleaner cuts.
Bevel adjustment: The bevel adjustment enables the user to tilt the blade for angled or bevel cuts, typically up to 45 degrees. It’s especially useful for projects requiring precision angles, such as trim work or furniture making.
Handle and trigger: The handle provides a secure, comfortable grip for better control, while the trigger operates the saw’s motor. Many models include a safety switch to prevent accidental activation, enhancing overall safety.
Safety guard: The safety guard covers the blade when not in use and retracts automatically during cutting. It consists of two parts: the upper guard (fixed) and the lower guard (spring-loaded). Together, they protect the user from accidental contact with the spinning blade.
Safety precautions
Using a circular saw safely is essential, especially for beginners. These power tools can cause serious injuries if not handled properly. Safety means protecting yourself, maintaining your equipment, and ensuring your workspace is prepared before every cut. The following key precautions will help you operate a circular saw with confidence and control.
Importance of safety equipment
Eye protection: always wear safety goggles to shield your eyes from flying wood chips, dust, and other debris.
Hearing protection: circular saws generate high noise levels that can cause hearing damage over time. Use earmuffs or earplugs, especially for extended cutting sessions.
Hand protection: wear work gloves to protect your hands and improve your grip. Choose gloves that fit snugly and allow flexibility for precise handling.
Dust protection: cutting materials like wood can produce fine dust that irritates your lungs. Use a dust mask or respirator to prevent inhaling harmful particles.
Proper clothing: avoid loose clothing, jewelry, or accessories that can get caught in the blade. Always wear fitted clothes and tie back long hair before operating the saw.
Tool and workspace safety
Unplug before adjustments: always disconnect the saw from its power source before changing blades, adjusting depth, or performing maintenance to prevent accidental starts.
Inspect the saw: before each use, check for damaged cords, dull blades, or loose screws. A well-maintained saw operates more safely and efficiently.
Clear the workspace: keep your cutting area clean and free from clutter, scrap materials, or obstacles. Ensure you have enough space to move the saw safely.
Maintain safe hand position: always keep your hands at a safe distance from the spinning blade. Use clamps, guides, or supports to secure the material instead of holding it by hand.
Preparing and using the circular saw
Using a circular saw safely and effectively requires proper preparation, correct positioning, and controlled cutting. Follow these step-by-step guidelines to achieve accurate results while maintaining safety.
Preparation
Use the correct blade: Always use a blade designed for the material you are cutting—wood, metal, plastic, or masonry. The wrong blade can cause poor-quality cuts or dangerous kickbacks. Use carbide-tipped blades for hardwoods and abrasive materials, and high-speed steel blades for softwoods and non-ferrous metals. More teeth create smoother cuts, while fewer teeth cut faster.
Measuring and marking: Measure your cut line accurately and mark it clearly using a pencil or chalk. Double-check measurements before cutting to avoid errors.
Adjusting blade depth and bevel angle: Set the blade depth so it extends slightly (about 6 mm or ¼ inch) below the material’s thickness. For angled cuts, adjust the bevel angle by loosening the bevel lever, tilting the base plate to the desired degree, and retightening. Correct depth and angle settings ensure accuracy and reduce strain on the motor.
Securing the material: Clamp the workpiece firmly using a vise or clamps to prevent movement during cutting. For larger or longer pieces, use supports or sawhorses to keep the material stable and level. A secure setup minimizes blade binding and kickback.
Positioning and starting
Placing the shoe flat: Ensure the saw’s base plate (shoe) rests completely flat on the material before starting the cut. A stable position helps prevent wandering or uneven cuts.
Checking the blade guard: Make sure both the upper and lower blade guards move freely. The guard must retract and return smoothly to protect your hands from the blade.
Starting before contact: Press the trigger to start the saw and allow the blade to reach full speed before touching the material. Engaging the blade at maximum speed ensures a smoother, more controlled entry.
Proper hand placement and body positioning: Hold the saw firmly with both hands—one on the main handle and the other on the front support handle. Stand with your feet shoulder-width apart and position your body slightly to the side of the cutting line, not directly behind the saw. This stance gives better control and protects you from potential kickback.
Making the cut
Maintaining steady pressure: Guide the saw smoothly along the cutting line using light, consistent pressure. Do not force the tool—let the blade do the work. Forcing can cause binding or kickback.
Keeping the shoe flat: Keep the base plate flat on the material throughout the entire cut to maintain precision and stability. Lifting the saw mid-cut can cause uneven results or blade jams.
Using guides for straight cuts: For long or accurate cuts, use a straightedge, guide rail, or clamp-on cutting guide to help you follow a precise line. This technique improves accuracy and reduces the risk of deviation.
Completing the cut
Supporting off-cuts: Support the off-cut section to prevent it from pinching the blade or falling unexpectedly as the cut finishes.
Releasing the trigger: After completing the cut, release the trigger and wait for the blade to stop completely before lifting the saw from the material.
Handling debris safely: Clear sawdust and off-cuts only after the blade has stopped. Keep your workspace clean and free of debris to maintain visibility and safety.
How to cut straight with a circular saw?
Cutting straight lines with a circular saw requires careful preparation, steady control, and the right guiding tools. Whether making crosscuts or rip cuts, accuracy depends on proper setup and smooth technique.
Types of straight cuts
Crosscut (across the grain): A crosscut runs across the wood grain, usually to shorten a board or create precise end cuts. It’s commonly used in framing, furniture building, and general carpentry.
Rip cut (along the grain): A rip cut follows the wood grain, allowing you to cut boards lengthwise. This is useful for resizing lumber or creating narrower pieces for construction or woodworking.
Tip: use a rip fence or guide rail for accurate rip cuts, and a miter gauge or crosscut guide for precise crosscuts.
Step-by-step guide to making a straight cut
Mark the cutting line: Measure carefully and draw a clear, straight cutting line using a ruler, square, or chalk line. Double-check all measurements before cutting to ensure accuracy.
Set the blade depth: Adjust the blade depth so it extends just slightly (about 6 mm or ¼ inch) below the thickness of the material. This minimizes resistance and provides a cleaner, safer cut.
Position the saw: Align the saw’s blade with your cutting line. Make sure the base plate (shoe) rests flat on the workpiece and the saw is steady before you start.
Secure the workpiece: Clamp the material firmly to a stable surface, such as a sawhorse or workbench. This prevents movement and ensures a smoother, more accurate cut.
Start the saw: Hold the saw firmly with both hands and press the trigger. Allow the blade to reach full speed before touching the material—this prevents chipping or kickback.
Guide the saw along the line: Move the saw steadily along the cutting line, keeping the base plate pressed firmly against the material. Use a straightedge, guide clamp, or fence to help maintain alignment for long cuts. Avoid forcing the saw—let the blade do the work.
Finish the cut: Continue until the saw reaches the end of the line. Release the trigger and wait for the blade to stop completely before lifting the saw from the material.
Check your work: Inspect the cut for straightness and smoothness. If adjustments are needed, review your marking and guide setup before the next cut.
How to cut a 45-degree angle with a circular saw?
A 45-degree cut, also known as a bevel or miter cut, is commonly used in woodworking projects to create angled joints, decorative edges, or trim work. Achieving a precise 45-degree angle with a circular saw requires accurate setup and controlled cutting. Follow these steps for best results:
Mark the angle: Measure and mark a 45-degree cutting line on the workpiece using a protractor, combination square, or miter gauge. Double-check the angle to ensure accuracy before cutting.
Set the bevel angle: Loosen the bevel adjustment knob or lever on the saw, tilt the base plate (shoe) to a 45-degree angle, and tighten the knob securely to lock it in place. Make sure the adjustment is firm to maintain accuracy during the cut.
Position the saw: Place the saw on the workpiece, aligning the blade with the marked cutting line. Ensure the base plate rests flat and stable against the material’s surface.
Secure the workpiece: Clamp the workpiece securely to prevent movement during cutting. Stability helps maintain precision and reduces the risk of kickback.
Start the saw: Hold the saw firmly with both hands and press the trigger. Allow the blade to reach full speed before contacting the material.
Make the cut: Guide the saw smoothly along the marked 45-degree line, keeping the base plate pressed firmly against the material. Maintain steady forward pressure—avoid forcing the saw through the cut.
Finish the cut: Continue guiding the saw until the cut is complete. Release the trigger and wait for the blade to stop completely before lifting the saw away from the workpiece.
Check the cut: Inspect the finished edge to ensure the angle is accurate and clean. If the cut is slightly off, adjust the bevel setting or guide alignment before attempting another cut.
Plunge cut
A plunge cut starts with the blade inside the material rather than at the edge. It’s useful for making openings or cutouts in the middle of a panel without pre-drilling.
Some circular saws have a plunge feature that lets you start the cut in the center of the workpiece. Always follow the manufacturer’s instructions for safe use.
How to cut a 4x4 with a circular saw?
Cutting 4x4 lumber with a circular saw requires proper setup and technique for safety and accuracy. Follow these steps:
Mark the cutting line: Measure and mark the line on the 4x4 using a square and pencil. Double-check your measurements for precision.
Set the depth of the saw: Adjust the blade depth slightly deeper than the thickness of the 4x4 using the saw’s depth adjustment lever.
Place the saw: Align the blade with the cutting line and ensure the base plate rests flat on the wood.
Secure the workpiece: Clamp the 4x4 firmly to prevent movement while cutting. This improves accuracy and safety.
Start the saw: Let the blade reach full speed before making contact with the wood. Hold the saw firmly with both hands.
Make the cut: Guide the saw steadily along the line, keeping the base plate flat and applying consistent pressure for a smooth cut.
Finish the cut: Complete the cut, then release the trigger and wait for the blade to stop before lifting the saw.
Check the cut: Inspect the result for straightness and smoothness. Make adjustments if needed.
Maintenance and care
Proper maintenance is essential to keep your circular saw running efficiently and safely. Regular care extends the tool’s lifespan and ensures smooth, accurate cuts every time.
Cleaning after use: After each use, remove sawdust, debris, and resin buildup from the blade, motor housing, and vents. Use a brush or compressed air to clean hard-to-reach areas. Keeping the saw clean prevents overheating and maintains performance.
Checking blade sharpness: A dull blade can cause rough cuts, kickback, and motor strain. Inspect the blade often and replace or sharpen it when needed. Signs of wear include dullness, sticking, warping, or missing teeth. If cutting becomes difficult or uneven, it’s time to change the blade.
Inspecting and lubricating moving parts: Check the depth and bevel levers, blade guard, and bearings regularly. Apply light lubrication to moving parts for smoother operation and reduced wear.
Safe storage: Store the saw in a clean, dry place, preferably in a case. Avoid damp or dusty areas, as moisture and debris can damage the motor and other components.
Conclusion
Learning how to use a circular saw can greatly improve your woodworking, construction, and DIY projects. This guide covered everything from setup and adjustments to essential and advanced cutting techniques for safe, effective use.
To ensure success and safety, always follow proper techniques—wear protective gear, take accurate measurements, and maintain steady control while cutting. Practicing on scrap material helps build confidence and precision. Regular maintenance, such as cleaning, blade inspection, and correct storage, keeps your saw performing reliably for years.
As a professional circular saw manufacturer, BISON provides high-quality, durable saws designed for both safety and performance. Our circular saws feature ergonomic handles, precise depth adjustments, and reliable blade guards to help you maintain full control during every cut. Explore BISON’s range of circular saws today and experience the perfect balance of power, accuracy, and safety.

Share :